File Transfer via SFTP
Use SFTP Client to connect to an SFTP Server for File Transfer
You can integrate your data with the Inspectorio SIGHT Platform via File Transfer utilizing SFTP with a storage service account provided by Inspectorio.
What is SFTP?
Secure File Transfer Protocol (SFTP) is a secure version of File Transfer Protocol (FTP), which facilitates data access and data transfer over a Secure Shell (SSH) data stream. It is part of the SSH Protocol. This term is also known as SSH File Transfer Protocol.
SFTP requires that the client user must be authenticated by the server, and the data transfer must take place over a secure channel (SSH). Both the commands and data are encrypted in order to prevent passwords and other sensitive information from being transferred over the network.
Requirements for establishing a connection via SFTP
When you want to connect to the SFTP server, you will have to submit the following basic information (this is required for any SFTP Client application):
✔ Username - This is the username assigned to your account on Inspectorio’s SFTP server.
✔ IP address or hostname - The designated IP address/hostname of the server.
✔ Port number - This is the corresponding port number of the SFTP service. Normally, that number would be 22.
✔ Private key - This is a special file used by the SFTP client to generate a digital signature which is uniquely identified with your user account and recognized by the server. That signature will then be used by the SFTP server to confirm your identity.
Configure SFTP Client
Inspectorio’s SFTP server has 2 methods for authentication (login):
• Using password authentication. With this method, we will provide you with the username & password for your specified account (organization).
• Using public key authentication. With this method, you need to create a key pair: public key + private key from your side (you can follow this link: here for creating a key pair).
Then you need to send us your public key and use your private key to authenticate your identity when you want to access to our server. When you have the credential, you will need to install a SFTP client. The following are tools that other organizations have used to integrate successfully with SFTP servers. Note that this software list is only for your reference. We do not hold any relationship with these software companies and we do not hold ourselves responsible for the quality or nature of their services.
• WinSCP
• PuTTY
Configuration of FileZilla & Cyberduck
If you choose to use the FileZilla or Cyberduck application as your SFTP client, then here are a few steps configure them:
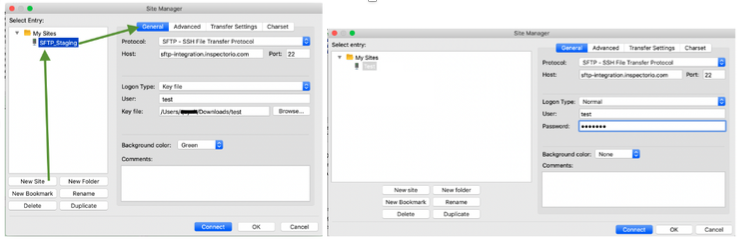
A. FileZilla
- Download the FileZilla application
- Select File → Site Manager… menu (or click on Site Manager icon)
- In Site Manager popup, press New Site button → edit the name if need
-
In General tab, input information as below:
a. Select SFTP - SSH File Transfer Protocol from the Protocol dropdown list
b. Input Inspectorio’s server link in the Host field:
- Production: sftp.inspectorio.com
- Preproduction: sftp.pre.inspectorio.com
c. Input 22 in the Port field
d. If you use Password authentication:
-
Select Normal from the Logon Type dropdown list
-
Input the username & password that we provided to you
e. If you use Public Key authentication:
-
Select Key file from the Logon Type dropdown list
-
Input the username that we provided to you
-
Submit your private key in Key file field
f. Press Connect
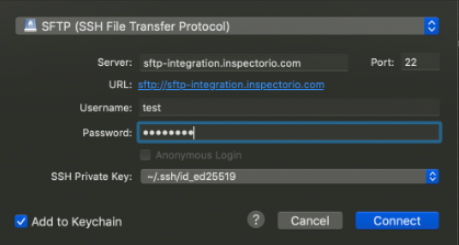
B.Cyberduck
- Download the Cyberduck application
- Press Open Connection
- Select SFTP (SSH File Transfer Protocol) from the dropdown list
- Input sftp.inspectorio.com in the Server field
- Input 22 in the Port field
- If you use Password authentication → input the username & password that we provided to you in the Username and Password fields
- If you use Public Key authentication → input the username that we provided to you AND submit your Private key in SSH Private Key field
- Press Connect