Getting Started with API Integration
Quick Start
Leverage a quick start to build your API client by importing a Postman collection of Inspectorio SIGHT API with the base URL of our testing environment.
Copy this link, then in Postman click on Import > Import From Link.
Paste the link, click on Import, and you’re all set!
API Integration Steps
To get started with APIs, you will authenticate with a test server API: the Pre-Production Server API. You will test sample Purchase Orders by making requests to the Pre-Production Server API. Then you will move to the real Production Server API. This will occur in five steps.
- Test Server Authentication: Authenticate with the test server API (
Pre-Production) using Inspectorio-provided credentials - Send a Sample PO: Establish connectivity by POSTing a sample purchase order
- Data Mapping: Agree on data mapping with your Inspectorio Implementation Manager
- Send Real POs: Send Purchase Orders to the test server API with your real data mapped to the Inspectorio API data structures
- Production Authentication: Authenticate with our Production Server API
While we are not affiliated with Postman, some clients have had success conducting these five steps using the Postman API Development Environment (which you can download here). This or any other API tool will help you learn how the Inspectorio API functions.
1. Test Server Authentication
The Pre-Production Server API is used for testing API connectivity with test data. The same credentials that you received to access this Developer’s Portal are the ones you will use to make requests to the test server API.
- Pre-Production Server API URL =
https://sight.pre.inspectorio.com/api/v1/...
password = "Password123"
username = "User1"
However, to make requests to the API, you must first hash your password with a SHA-512 hash protocol. You will input your username and hashed password in JSON format in the request body, point to the auth/login URL on the Test Server API, and send the POST. There are multiple free hashing tools online that you can use to achieve this purpose. Here is one tool that some of our clients have used: https://www.miniwebtool.com/sha512-hash-generator/. We are not associated with this website and encourage you to use whichever hashing tool you prefer.
{
    "password": "6a55690158fa704dcb667f781aae5d013976...",
    "username": "User1"
}
After POSTing this authentication request successfully, you will receive a response containing a token and a refresh token. In all requests, you must include a the following in every header: a “key” with title = “token”, and “value” = token that you just generated in the previous POST.
token: 4e3ic5mw543oo5g583ndfg...
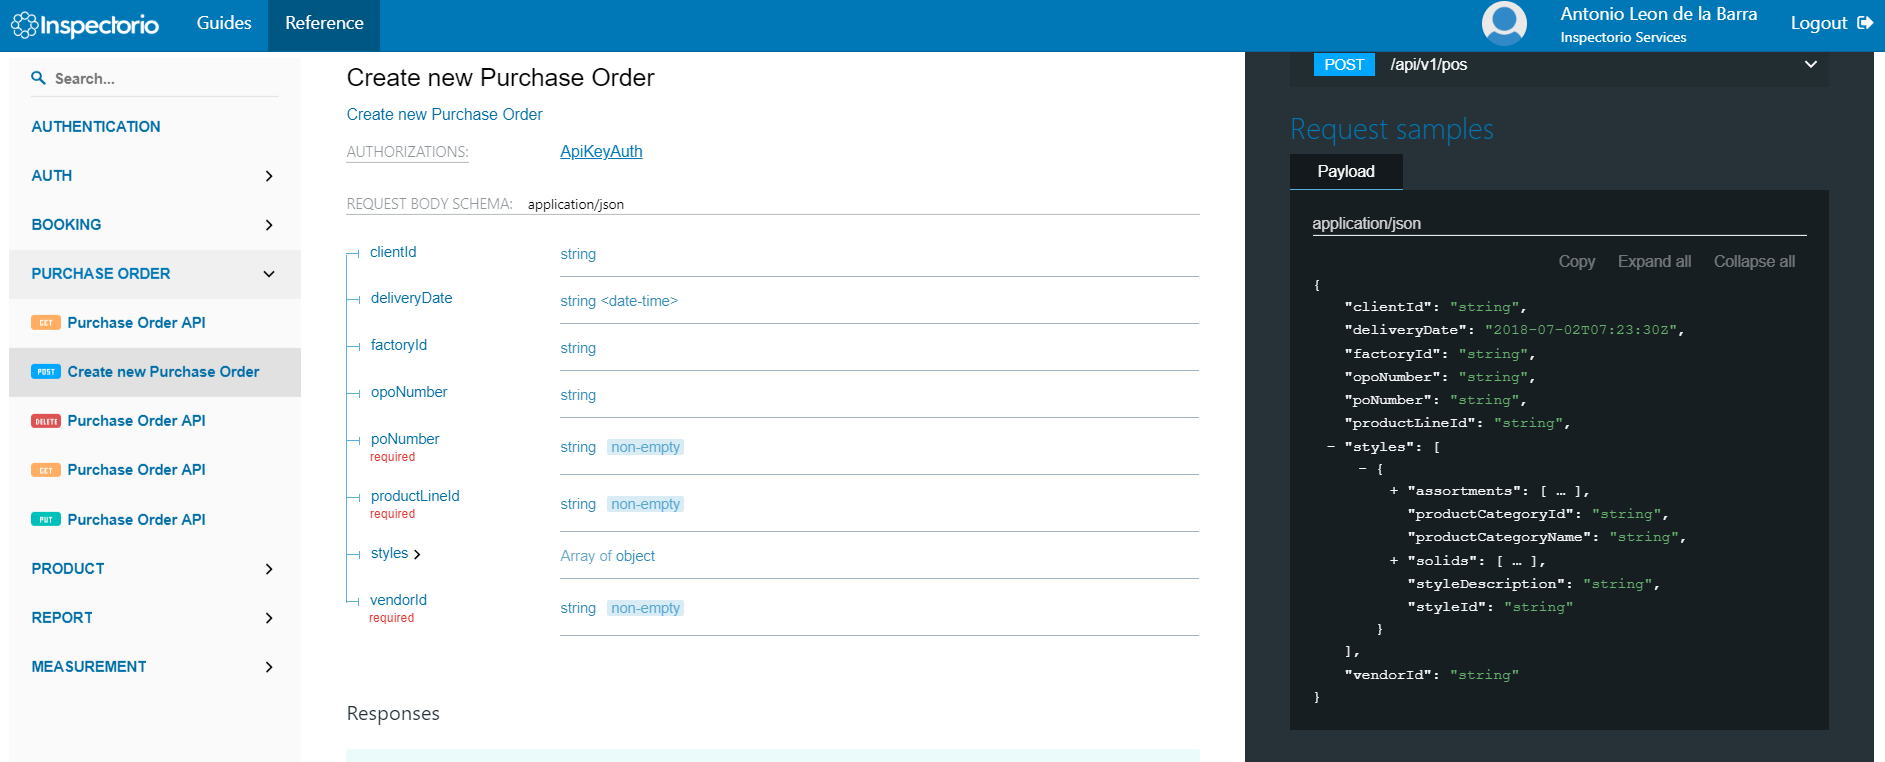
This “key” format is specified in our References page under the Authentication section as seen in the screenshot below:

Note that tokens expire automatically after 60 minutes. When your token has expired, you can use your refresh token in a POST request to the auth/refresh URL. You can continue to use your refresh token until it has been blacklisted.
2. Send a Sample PO
Once you have successfully authenticated yourself with our test server API and received your token and refreshToken, you can make your first test API request to ensure proper connectivity. As a reminder, the token should be included as a “key” in the header of each request.
On the Sight API Reference available in this developer’s portal:
- Expand the Purchase Order > POST Create new Purchase Order method
- Copy the JSON content in the request area
- Set the URL as the test server URL:
https://sight.pre.inspectorio.com/api/v1/... - Send the request and verify a successful response
We will be expecting the values present in our sample code, thus it is important that you follow this step as indicated. Your Inspectorio Implementation Manager will confirm that the request was submitted successfully.
3. Data Mapping
Your Inspectorio Implementation Manager will schedule a phone call with you or someone from your team to align terminologies.
The goal of this meeting is to align your internal data fields to the Inspectorio data fields. Using Inspectorio data fields is required for API Integration. These fields are outlined in detail on the API Reference available on this developer’s portal.
Each company has their own way of processing and tracking inspection data. Thus, it is common for companies to have different ways of referring to similar concepts. For example, in Inspectorio, “Item” is the term for “SKU” (stock-keeping unit), and each “Item” has a unique style, color, and size. It is possible that the data field “SKU” in your internal system could be mapped to “Item_ID” in the Inspectorio data structure. In order for your company to use Inspectorio successfully, it is pivotal that there be alignment between your terminology and ours, especially during data transfer.
4. Send Real POs
After data mapping, you should be able to test sending multiple purchase orders with real data to the test server API. In order to make this corroboration step as thorough as possible, we ask that you send at least two POs with packing information; one PO with assortments and another with solids. At this step, we encourage you to send as many POs as possible containing the data that you will expect to see in the POs in the Inspectorio platform.
5. Production Authentication
The Production Server API will be used to transfer live data for real inspections, so it is important to verify API connectivity with the test server API first. When you are ready to send requests to the Production Server API, your Inspectorio Implementation Manager will give you access.
- Production Server API URL =
https://sight.inspectorio.com/api/v1/...
You will receive an email with a link inviting you to join Inspectorio. Click on this link and you’ll be taken to a page where you will setup your username and password for the Inspectorio Production Server platform. These credentials will be the ones you use to make requests to our Production Server API. As a reminder, you will also need to hash your Production password to authenticate with the Production Server API. After this point, you can change all instances of Pre-Production Server API URLs to Production Server API URLs in your API requests, and begin by authenticating to generate a Production token.
Important note These credentials will enable you to access the Production Server API, but NOT necessarily the platform user interface. So, when you finish updating your Production credentials, you will be redirected to a page with messages that read You do not have permission to access. This is normal. The messages will appear just like the ones in the image below.

Once you finish these steps, you have officially completed API Integration.
References
We provide all of the necessary references for you to connect with our API. Find here all of our entities, query parameters, methods, and examples to help you build your code successfully.
Find everything you need in the API Reference documented in this developer’s portal.